Online Kitchen Planner: What It Gets Wrong Before You Start
Every free online kitchen planner is built by a company that sells kitchens. That is not an accusation, it is simply the business model, and it explains the single thing they all share: the software will happily let you put a 600mm oven door where it hits the island, hang a recirculating hood that does not satisfy Building Regulations, and render the result beautifully in 3D with a price attached.
An online kitchen planner is a visualisation tool and a quoting tool. It is not a design tool. The design happens first, on paper, using about six numbers, and this page is those six numbers followed by an honest read on which planner to open afterwards.
The measurements that decide your layout
Write these down before you open anything. Every one of them is a constraint the software will not enforce.
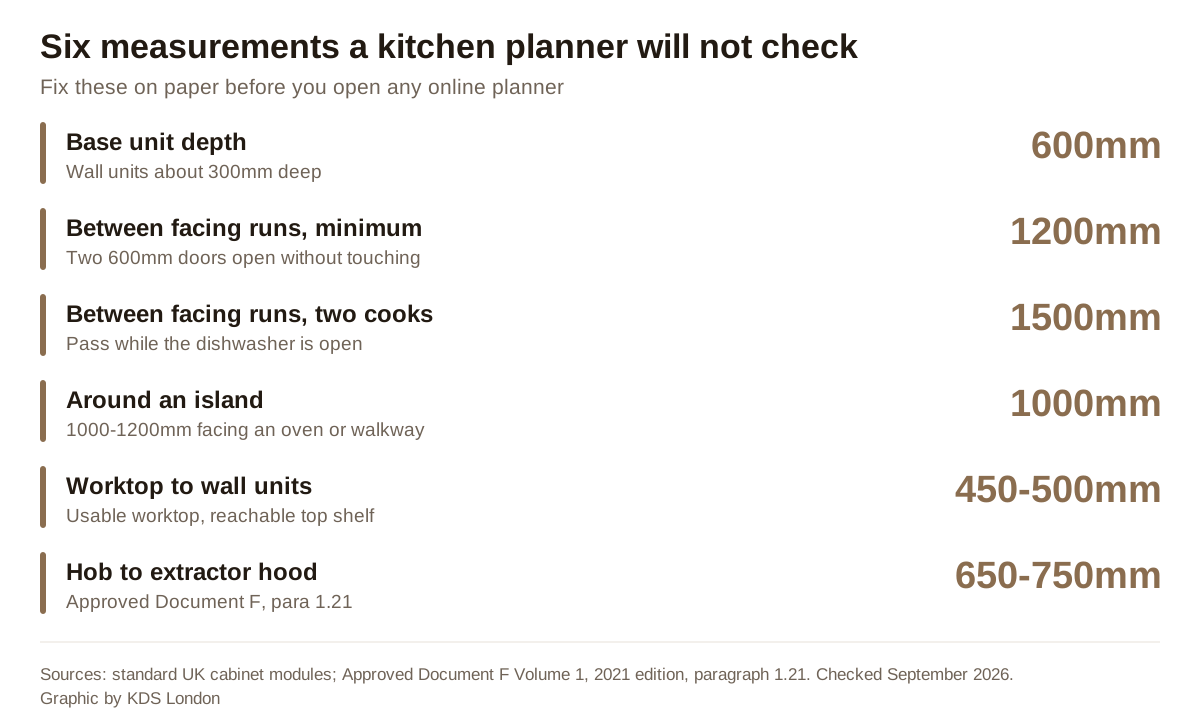
- Base units are 600mm deep, wall units around 300mm. Worktop overhangs the base unit slightly, so a run of units eats roughly 650mm of floor depth including handles and plinth.
- 1200mm minimum between facing runs. Most doors, and most appliance doors, open about 600mm. Two facing 600mm doors need 1200mm just to open without touching. Take that as the floor, not the target.
- 1500mm between facing runs if two people cook. At 1200mm you can pass with the doors shut. At 1500mm you can pass while someone is at the open dishwasher.
- 1000mm minimum around an island, and 1000mm to 1200mm on the side that faces the oven, the dishwasher or a through route. The clearance is measured worktop edge to worktop edge, not unit to unit, so an overhanging breakfast bar eats into it.
- 450mm to 500mm from worktop to the underside of wall units. Less and you cannot use the worktop; more and the top shelf is out of reach.
- 650mm to 750mm from hob to extractor. This one comes straight from Building Regulations, and it is covered below.
Nothing in that list is exotic. All of it is routinely broken in plans people bring to us after an evening with a free planner, because the planner accepted it.
The one rule a planner will never check: Part F
This is the trap worth reading twice, because it is the one that costs money after the units are in.
Approved Document F Volume 1, 2021 edition sets minimum extract rates for an intermittent extract system. Table 1.1 gives them plainly:
| Room | Minimum intermittent extract rate |
|---|---|
| Kitchen, cooker hood extracting to the outside | 30 l/s |
| Kitchen, no cooker hood or hood not extracting to the outside | 60 l/s |
| Utility room | 30 l/s |
| Bathroom | 15 l/s |
| Sanitary accommodation | 6 l/s |
Read the second row again. A recirculating hood, the kind that filters the air and blows it back into the room, is treated as no hood at all. If that is what you fit, the kitchen still needs 60 l/s of extract to outside from somewhere else. Every planner in the country will let you drop a recirculating hood over an island in the middle of a room with no route to an outside wall, and none of them will mention it.
The same document, at paragraph 1.21, sets the hood height: follow the manufacturer’s instructions, or where there is no specification, between 650mm and 750mm above the hob surface.
So before you place a hob, answer one question: how does air get from above it to outside? An external wall behind the hob is easy. An island hob in the middle of a large room means a duct through a ceiling void or a floor, and that decision belongs at the start of the plan, not at the end.
What each planner is actually good at
Free planners are good at two things: showing you what a finish looks like, and producing a costed list of that maker’s own products. They vary mostly in how much they will let you control.
IKEA Kitchen Planner. The most detailed of the retailer tools, and the only one that lets you position pipes, sockets, radiators and vents, which makes it the closest to a real plan. It runs in the browser, saves your design and produces a PDF plus an item list. The catch is the obvious one: everything in it is an IKEA cabinet on IKEA module sizes, so a plan that works here does not transfer cleanly to another supplier.
Wren’s online planner. Genuinely good on finishes. You can swap door styles, colours, worktops, splashbacks and flooring and see the result, which is the job most people actually want done. It is much more restricted on layout, so treat it as a showroom rather than a drawing board.
Howdens. Not a self-service planner in the same sense. Howdens sells through trade accounts, and its route is a design appointment at a local depot with a survey and a 3D plan drawn by their designer. If you already have a builder with a Howdens account, this is the efficient path.
B&Q, Magnet and Wickes. All serviceable, all easy, all print a plan. None will surprise you. Use whichever supplier you are likely to buy from, because the value is the costed list at the end.
General 3D tools such as SketchUp Free, Planner 5D and RoomSketcher are supplier-neutral, which matters if you are mixing cabinets from one place with worktops from another. They cost you time instead, because nothing is pre-drawn.
The honest summary: use a retailer planner to price and to look, use a neutral tool to think, and do not expect either to tell you a layout is wrong.
How to use a planner properly, in order
- Measure the room first, in millimetres, at three heights. Floor level, worktop level and 2m. Old British houses are not square, and a 40mm difference across a 4m wall will decide whether a run of units fits at all. Note window reveals, the sill height, door swings, the boiler, the stack and every socket.
- Mark the immovable services. Waste for the sink, gas for the hob if you keep gas, the consumer unit, the boiler flue, and any route available for extract ducting. These decide more of the layout than anything aesthetic will.
- Draw the layout on paper using the six numbers above. Decide on the shape before you decide on the finish. Our guides to galley, L-shaped and U-shaped kitchens cover which shape suits which room.
- Only now open the planner, and rebuild your paper layout in it. You are using the software to check module sizes against real cabinets and to see the finish, not to invent the plan.
- Test every door. Open the oven, the dishwasher, the fridge and the bin drawer in your head, one at a time, and check what each one hits. Corner units are the usual casualty: two doors meeting at an internal corner will foul each other unless there is a filler panel, and planners cheerfully omit fillers.
- Print the plan and stand in the room with it. Mark the island footprint on the floor with masking tape and walk around it. Five minutes of tape has saved more kitchens than any amount of 3D rendering.
Where the estimate will be wrong
The number the planner gives you is a cabinet and worktop number. It is usually accurate for what it covers, and it covers less than half of the job.
Not in it: removing the old kitchen, plastering, electrics and any new circuits, plumbing moves, flooring, the extract duct and its external terminal, tiling, painting, and the fitter. On a London job those items routinely add up to more than the units themselves, and appliances are often excluded or set to a placeholder model.
Two other things to watch. Worktops quoted as a length of laminate will not resemble a quoted stone template, which is measured after the units are installed. And any layout change after the survey, however small it looks in the software, reprices the lot.
Use our London renovation cost calculator alongside the planner’s figure, and read what a new kitchen costs for where the money actually goes.
When to stop planning and get a designer in
A planner is enough if the room is a sensible shape, the services stay where they are, and you are replacing like with like. That is a large share of kitchens and there is no shame in it.
Bring in a designer when any of the following is true: you are moving the sink or the hob more than a metre, you are knocking through or building out, the room is an awkward shape with a chimney breast or a sloped ceiling, the hood needs a duct run you cannot see a route for, or the kitchen is part of a wider open-plan space where the sightlines matter. Our pages on kitchen extensions and open-plan kitchen living rooms cover those cases.
The same logic applies one room over, and we have set it out for bathrooms in the bathroom planner guide, where the drainage constraints are even less forgiving.
Frequently asked questions
Is there a genuinely free online kitchen planner? Yes, several. IKEA, Wren, B&Q, Magnet and Wickes all offer free browser-based planners, and neutral tools such as SketchUp Free and Planner 5D have free tiers. They are free because they exist to sell you kitchens or subscriptions, which shapes what they will and will not let you do.
Which online kitchen planner is the most accurate? IKEA’s is the most detailed of the retailer tools, because it lets you place services such as pipes, sockets, radiators and vents alongside the cabinets. Accuracy still depends entirely on the measurements you type in, and none of them validates clearances or Building Regulations.
Can I use an online kitchen planner for a quote from another supplier? Only as a starting point. Each retailer’s planner uses its own cabinet modules and pricing, so a plan built in one will not transfer cleanly to another. Use it to fix the layout and the appliance positions, then have the new supplier redraw it in their own system.
How much space do I need between kitchen units? At least 1200mm between facing runs, because appliance and cabinet doors open around 600mm each. Allow 1500mm if two people cook together. Around an island, leave at least 1000mm worktop edge to worktop edge, and 1000mm to 1200mm on any side facing an oven, dishwasher or walkway.
Does a recirculating cooker hood meet Building Regulations? No. Approved Document F treats a hood that does not extract to the outside the same as having no hood at all, which means the kitchen needs 60 l/s of intermittent extract to outside from elsewhere in the room, rather than the 30 l/s a ducted hood over the hob would provide.
How high should a cooker hood be above the hob? Follow the manufacturer’s instructions. Where none are given, Approved Document F says between 650mm and 750mm above the hob surface. Check the figure before you fix the wall unit heights either side, because the hood sets the line they have to match.
Do I still need a kitchen designer if I have used a planner? Not always. If the room is a regular shape and the sink, hob and waste stay where they are, a planner plus careful measuring is usually enough. Get a designer involved if services are moving, the room is awkward, the extract route is unclear, or the kitchen opens into a living space where the whole room has to work together.
The Folio
Want more like this in your inbox?
One considered idea for your London home, every Thursday.
SubscribeMore from KDS London
All guides
How Much Does an Interior Designer Cost in London in 2026?
What interior designers charge in London in 2026: hourly rates, day rates, per-room fees and percentage models, with real figures and what each one buys you.
Read
Navy Kitchen Ideas: Blue, Teal and Cobalt Cabinet Designs
Navy kitchen ideas that work: the best blue cabinet shades, worktop and hardware pairings, and how to use navy, teal and cobalt without dating the room.
Read
Gold and Brass Bathroom Accessories: How to Style Warm Metallics
How to choose and style gold bathroom accessories and brass fittings, from brushed vs polished finishes to mixing metals and avoiding tarnish.
Read